
Commuting with an e-bike
The backstory
I've been commuting with an e-scooter for over 2 years, but there was room for improvement:
An #escooter is great for < 5km trips on fairly level terrain. Where they fail is up long hills. They slow down a lot and eat through battery. I tried scooting 8km mostly uphill in eco mode, and averaged only 16km/h (with lots of assistance).
— Toby Kurien (@TobyKurien) February 2, 2019
Basically my daily commute looked like this: I was scooting to a bus stop about 3km away from my house, then waiting for a bus, then taking the bus to the train station, then waiting for the train, then taking the train into the CBD, then unpacking the e-scooter I'd been carrying with me all the way, and riding it to the office. This worked well for the most part, except when it didn't: bus drivers on strike, bus being late due to traffic, and finally, the e-scooter eventually broke (after about 1500km of riding it), so I decided to look at another option: an e-bike. The idea being that I could ride the e-bike all the way to the train station.
So, in my quest for #emobility all the way up the 8km daily uphill route, I have purchased a commuter #ebike - let's see how this goes! pic.twitter.com/BEWsi6qD6S
— Toby Kurien (@TobyKurien) February 2, 2019
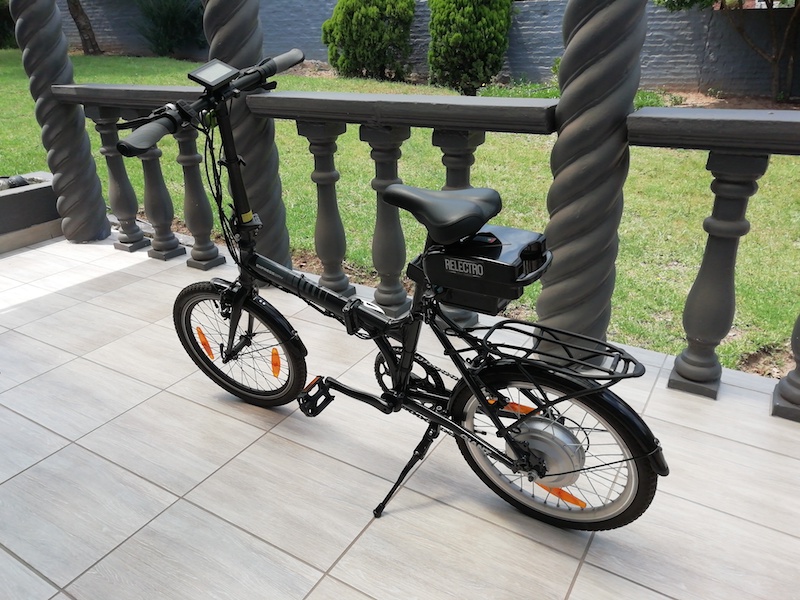
I did a lot of research, and finally decided to buy a Giant Expressway 1 folding bicycle, and an e-bike kit, from Relectro. This is a beautiful, light-weight, high-quality commuter bike that I really love riding. As a DIY enthusiast who's previously built my own full-sus mountain bike from parts, I was only too happy to buy the kit separately and assemble it all myself. Relectro were super helpful in helping me decide between upgrading the battery on my e-scooter, retro-fitting my mountain bike, or getting a separate e-bike. It took me a few days to get everything set up (with help from Relectro), and a few weeks to understand all the settings available on the LCD controller! (Don't worry, I'll break it down for you below)
The new commute
The big question for the new commute is: do I take the bike on the train, or what do I do when I get to the other side? To be honest I didn't know what the answer would be. I knew I'd figure it out eventually. One thing I didn't want to do: fold up the e-bike, pack it into a bag (as mandated by gautrain), carry it onto a packed train, then unpack and unfold on the other side. Once the e-bike kit was installed onto the bike, it was no longer light-weight: it now weighs around 20kg.
So Plan A was this: carry the lightest of my e-scooters on the e-bike, to the train station, then carry it on the train, and then use it on the other side! Here's what that looked like:
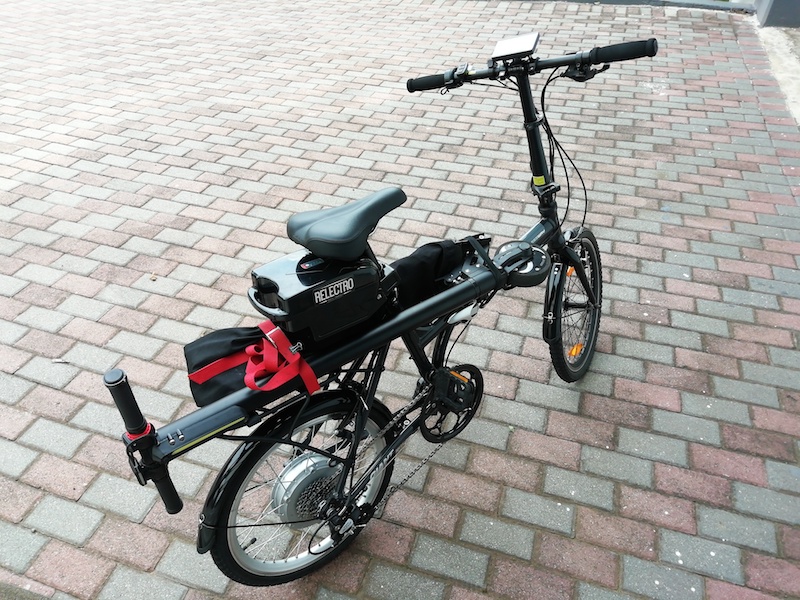
This actually worked! However, it was a bit cumbersome, and eventually I decided (after speaking to a few security guards) to trust the security at the Gautrain station, and rather just lock up my e-scooter on the other side, than carry it daily.
Commuting Utopia
Finally, commuting utopia! I don't have to carry anything other than my backpack on the e-bike or train, my e-bike ride is so much fun that I look forward to it daily, and my scoot to the office on the e-scooter is a quick and fun zip to the office.
My commute time is now so deterministic, that I can minimize my wait time for the train, and arrive at the office at anytime I choose. I can choose to take the first of the off-peak trains for comfort, space, and saving money. I also save a lot of money compared to taking the car (fuel, parking fees, etc) that my e-bike will pay itself off in about a year.
One of the biggest benefits is health and weight-loss. I have lost so much weight in just a month of e-biking, that I am now at BMI levels I last saw almost 10 years ago. You might wonder how that can be, if an e-bike does all the work? Well it can, but it is much more fun (and you get more range and battery life) if you put in some effort. It turns out that even a fairly minor amount of effort will raise your heart rate and give you the benefit of cardio, without the sweat and tiredness that follows a tough cardio routine. To put things into context, a mountain bike ride along the same route takes me 50 minutes and completely drains my energy, while on the e-bike it takes me 21 minutes and I still have energy to face the day.
Technical
For the geeks, here's some technical information about the e-bike and the electronics behind it:
- Bike: Giant Expressway 1 folding bike (weights around 12kg)
- Battery: 36V, 10.4Ah, 10s4p 18650 cells
- Motor: Greenpedel GP-G500 500W motor, max speed ~32km/h
- Controller: KT-LCD3 with 20A contoller, with both throttle and pedal-assist sensors.
For technical details about controllers, batteries, motors (direct drive vs geared, etc.), and so on, please check out the documentation on the Relectro website - it is quite comprehensive!
The manual for the KT-LCD3 controller is however quite cryptic, so it took me a long time to figure most of it out. For your benefit, here's what I've figured out so far and my recommendations (refer to the manual on how to access the various settings):
User settings
The "General Project Setting" refers to the basic user settings available:
- Maximum trip speed: the speed at which the power to the motor is cut off. While you can set it to any high value, there is a hard-coded power limit in the controller that kicks in at 25km/h, with a hard cut off at about 32km/h. You can go faster downhill, but with no motor assistance.
- The rest of the settings are self-explanatory.
P Settings
- P1: You will need to find out how many magnets your motor has, and it's gearing ratio, from the manufacturer. In my case, gearing ratio is 1:5, and magnets is 20, so the value is 5 x 20 = 100.
- P2: The default is 0, which is a bad value! If you switch on your bike, then walk with it for at least 10 seconds, you should see a speed of around 5km/h appearing on the LCD (if not, try another value). When set to 0, the speed will only appear if you are pedalling or using throttle, which means that while you are not using the motor (coasting), no speed appears, and more importantly, the distance is not added! So the distance will always under-read. On my motor, setting this to 1 worked, i.e. there's one speed pulse per revolution of the motor.
- P3: determines how the assist gears work. If set to 0, assist gears limit speed, and if set to 1, assist gears limit power. I much prefer setting this to 1 for a smooth get-away, and also because you can control how much power each gear provides by setting C14 accordingly (see below). In speed-limit mode (P3 = 0), it applies max power when you start pedalling, and then hard-cutoff when you get to the limit speed (e.g. gear 1 around 22km/h, gear 2 around 25km/h, etc.) which is jerky and potentially dangerous.
- P4: set to 1 -> By "handlebar", they mean "throttle". P4 = 1 will stop the throttle from being active if you are not pedaling (except in special cases, see C4 below).
- P5: set to around 12 for 36V. This controls how the "bars" on the battery meter works. A low value means less "damping", i.e. how quickly it will keep going up and down as you decrease and increase motor power.
C settings
- C1: install the pedal sensor magnets the way the arrow on it displays. Then if it's inverted, change this from 1 to 6 or vice versa and it will work correctly.
- C3: set to 0 -> when bike is switched on, it will start with assist level 0 (for safety, think kids playing with throttle while bike is parked). I think if you set this to 8, it will remember whatever gear you were on last.
- C4: set to 1 -> determines throttle mode. With this setting (and P4 set to 1), throttle will act as "walk mode" when not pedaling, and full power when pedaling. Mode 4 is also a good one: the throttle is limited according to the assist gear.
- C9: allows you to set a pin code that you have to enter to ride the bike. I don't recommend it, because if you forget the pin code, you need to either replace the controller, or else copy settings from another controller using a special cable.
- C14: This changes the power limit level of gears 1 to 4 to weak (C14 = 1), medium (C14 = 2), or strong (C14 = 3), but only if P3 = 1.
Check back later as I will keep updating this post.
Follow my thoughts and experiences on my twitter #ebike hashtag.